


Massa is a truly decentralized blockchain controlled by thousands of people. Massa proves to be one of the most decentralized networks due to the high number of nodes and the fact that most of these nodes are routable.
Update
Testnet 7.0 Started !
Community
The Massa community is growing and developing day by day. As part of the community, you can contribute to the decentralized network.MassaWelcome to the decentralized and scaled blockchain!t.meJoin the Massa Discord Server!Check out the Massa community on Discord – hang out with 12,137 other members and enjoy free voice and text chat.discord.gg
Creating a Node ( TEST 7.X )
To create a Massa node, make sure that your server meets the system requirements.
Minimum System Requirements
8 GB Memory, 4CPU, a stable internet connection that is not choppy and Ubuntu operating system.
Beginning
After accessing our server, we’ll update it using the following codes.
sudo apt-get update
sudo apt-get upgrade
We have updated our server, now let’s go to the port settings.
In some server providers, port settings are made from the panel. If yours is, then skip this part and start with the node creation part. Example Google Cloud
#Let's activate the firewall so that we can set the ports
sudo ufw enable#to open the required ports, write the following codes, respectively
sudo ufw allow 22
sudo ufw allow ssh
sudo ufw allow 31244
sudo ufw allow 31245#let's view the ports we have opened
sudo ufw status
we have set our ports, now the image should look like this
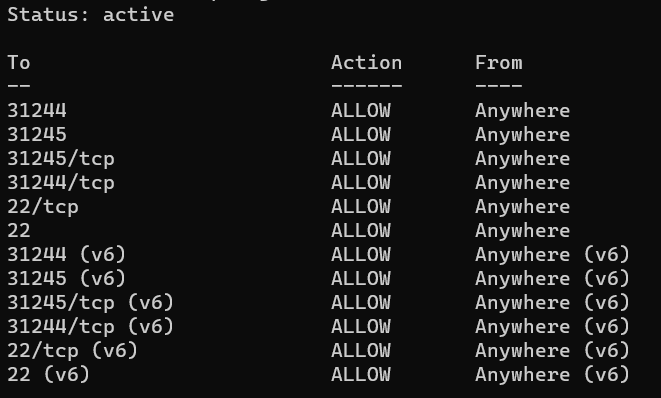
if it looks like this, let’s restart our server
reboot
You can check the open ports here
ports may not come immediately wait 10 minutes
When our server starts, all our ports will be set up.
Node
Let’s download the necessary libraries to install our Massa node
Write the commands in order
- on Ubuntu, these libs must be installed
sudo apt install pkg-config curl git build-essential libssl-dev- install rustup
curl --proto '=https' --tlsv1.2 -sSf https://sh.rustup.rs | sh- configure path
source $HOME/.cargo/env- check rust version
rustc --version- install nigthly
rustup toolchain install nightly- set it as default
rustup default nightly- check rust version
rustc --version- clone this repo
git clone --branch testnet https://github.com/massalabs/massa.git
if you have completed these steps, we have installed the necessary libraries for Massa
Our next step is to run the node and client
First, let’s create a new window
screen -S massa
cd massa/massa-node/config let’s go to the folder
nano config.toml
we have created a file in which we will register our ip address
[network]
routable_ip = "AAA.BBB.CCC.DDD"
“”AAA.BBB.CCC.DDD” type the ip adress of your server
CTRL + S save the file and CTRL + X exit by pressing
we have done what should be for a routable node
cd ../
backwards from our location -> massa/massa-node
now we can start our node
RUST_BACKTRACE=full cargo run — release |& tee logs.txt
let’s wait a little
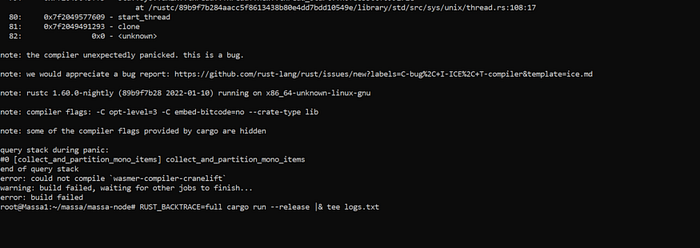
If you receive this error, type the following code and run it again
rustup default nightly-2021–12–01
we have successfully executed our node, it’s time to run the client
CTRL + A + C
we create a new window with the command
we go to the file location where the client is located and run
cd massa/massa-client/
cargo run --release
we have successfully executed the node and client

now let’s create a new wallet
wallet_generate_private_key
to view our wallet, let’s type
wallet_info
we need to ask for tokens from the tap so that we can take the next step

Go to the discord server and enter the wallet address you created in the client.
Make sure you don’t type in your private key
we have enough tokens to buy a roll
buy_rolls adress 1 0
#enter your wallet address in the adress section
now let’s put our node on the network
node_add_staking_private_keys privateKey
#Enter your private key in the privateKey section
Our next step is to register our node on the discord bot

Go to this channel and click on the uptick emoji, and the bot will send you a message.
node_testnet_rewards_program_ownership_proof your_staking_address 00000000000
in the your_staking_address section, type the address of the wallet that we created on the client and copy it without disturbing anything else.
type this code into the client write the returned value to the discord bot
Send your server’s ip address to the Discord bot
Congratulations we have successfully registered your node.
CTRL + A + D
exit the window that we created by pressing.
if u want re-enter screen -r massa write


